| Q/. Setting up Personal Web Server using Windows XP A/. Configuring Microsoft Windows XP Professional
See also
http://www.webwizguide.com/asp/tutorials/installing_iis_winXP_pro.asp
There are three steps in setting up Windows XP Professional after you have unzipped YVS500 software into some directory.
Enable web sharing for YVS500
Make sure the database directory has the correct read/write permissions
Updating YVS500 Configuration file shop$config.asp
Enabling Web Sharing for the YVS500 folder
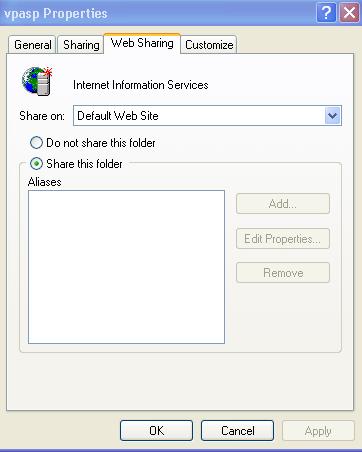
Right click on the folder that contains the YVS500 Shopping cart files and select properties then click on the Web Sharing tab on the top part of the dialog box.
If there is no Web Sharing tab then IIS is not installed on your machine, you can install IIS from your Windows XP Professional cd-rom.
Setting the Alias
Click on Share this folder then a dialog box will appear

Enter in the desired alias for the shopping cart by typing it in the Alias text box.
The alias will be the location of the shopping cart as people will see it from the web.
Eg. If the alias is yvs500 then the URL of the Shopping Cart will be http://127.0.0.1/yvs500
or try
http://localhost/yvs500
For your local PC
Click ok on the Edit Alias dialog box.
Click ok on the folder properties box.
The install is completed.
Possible Errors
When you are attempting to browse a Web page, the following error is displayed:
You are not authorized to view this page
You do not have permission to view this directory or page using the credentials you supplied.
HTTP 401.2 - Unauthorized: Logon failed due to server configuration
Internet Information Services
Click here for a solution
or see
http://support.microsoft.com/default.aspx?scid=kb;en-us;Q253667
Next Page
The next steps are optional.
printable version Back to Main Page |